Mount Caburn (2)
Posted: 18 October 2008 22:25
I went back to record the various WW2 earthwork defences on Mount Caburn today and to compare my research with the published data on the area.
Below is the plan with the trench locations from my previous post; these positions are those given in Marking time and making space: excavations and landscape studies at the Caburn hillfort (Drewitt and Hamilton, 1999).

I set out to investigate the area armed with some documentary evidence. The numbers are my own system of identification and are not wartime.

Trench 1
This position is situated on a promontory overlooking the valley to the NE; it appears to consist of a raised earth breastwork that takes angular turns in its course, creating a 3-sided position.
Although I could identify the breastwork, the position was overgrown with thick brambles and vegetation, making it hard to draw any further conclusions; the photo below gives a rough indication of the breastwork.

Trench 2
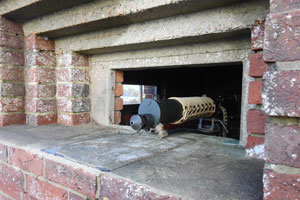
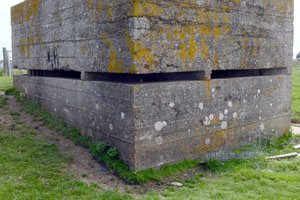
In many ways Trench 2 is the most interesting, being the most visible and most intact position on Caburn.
Again, a breastwork has been raised above ground level, presumably to raise a parapet to a height at which a clear field of fire can be gained over the undulating ground around the position.
The photo below shows the trench outlined.

The breastwork is about 60cm high and over 2m thick at the base; in the absence of further information, I assume that a shallow trench was dug, the spoil being used to create the breastwork in order to provide adequate protection for the defenders.
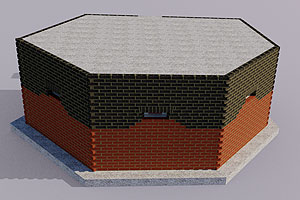
As the position was constructed by engineers and to be occupied by the very same unit, it stands to reason that they would have dug in with the parapet at least 3 feet above the floor of the trench. The 60cm high breastwork is sufficient to lie slumped behind in defence, but would not be comfortable for prolonged occupation, hence my theory that a trench was dug and subsequently filled in.
The two images below are speculative reconstructions of how the position might have looked; the method of revetment and depth of trench is based on data from slit trenches surveyed as part of the Downsforce project which were constructed at the same time as the positions on Caburn.


The accuracy of these reconstructions could be confirmed or disproved by a proper archaeological excavation of the Caburn defences; are the breastworks sandbag walls turfed over? Were trenches dug behind the parapets? If so, how deep and how were they revetted? What can the back-fill spoil tell us?
Trench 3
Trench 3 is yet another breastwork, situated high up on the ramparts of Mount Caburn to the rear of trench 1. It seems that the rampart forms the front edge of the trench, and the breastwork has been built up as the rear wall of the position; I've outlined the trench below:

My observations differ slightly to those given in Marking time... which records this position as a short straight trench. From what I think I can see, it would appear that the trench actually extends further eastwards and is angled at its western end, making it 15m in total.
Trench 4
Again, my observations differ; it's recorded as a three-sided trench, but to me it seems to be L-shaped. It may be that vegetation is covering a section that I can't see.

The trench is situated on a promontory and can cover the rear of trench 2.
Trenches 5-8 and 10

These trenches are of similar form as seen here.
Trenches 5, 7 and 8 are 450cm long, while trenches 6 and 10 are about 330cm. All are about 80cm wide.
Trench 9
Trench 9 is unusual in that its size (2m x 5m) is far bigger than a standard slit trench. It is also sited further forward and lower than the line held by trenches 5-8 and 10; for this reason I don't believe that it was originally dug as a defended post, though it may later have been occupied as such.
- Pete

Email:
Blog Latest
Bishopstone reveals its pillbox secrets
18 October 2021
Pillbox or Observation Post?
10 June 2020
Uncovering the hidden secrets of a pillbox
8 June 2019
Review of 2018
31 December 2018

Wartime Christmas in East Sussex (2)
24 December 2018
Jargon-buster
Slit trench
Small, narrow trench designed to provide protection against shrapnel and other battlefield hazards. Technically distinct from a weapon pit (which was intended soley as a defensive position) slit trenches were also used as defence works.
This site is copyright © Peter Hibbs 2006 - 2026. All rights reserved.
Hibbs, Peter Mount Caburn (2) (2026) Available at: http://pillbox.org.uk/blog/216573/ Accessed: 24 June 2026
The information on this website is intended solely to describe the ongoing research activity of The Defence of East Sussex Project; it is not comprehensive or properly presented. It is therefore NOT suitable as a basis for producing derivative works or surveys!